This article describes how to Setup and Install SharePoint 2007 Server (MOSS 2007) on Virtual PC
Before you start installing, Make sure that you downloaded following software’s.
- 1. .NET Framework 2.0
- 2. .NET Framework 3.0
- 3. Windows SharePoint Service 3.0
- 4. Windows SharePoint Service 3.0 SP 1
- 5. Virtual PC 2007 and
- 6. Windows Sever 2003 R2.
The following process includes creating a new VM definition, adjusting the settings, and installing the operating system (OS) and .NET Frameworks. (Take note that this process will take about three hours.)
Setup Victual PC
- 1. Click New... and Click Next
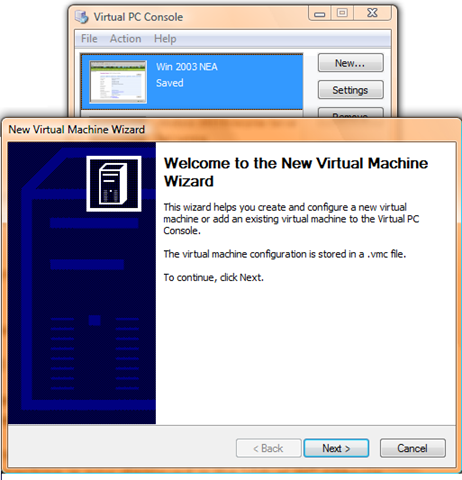
- 2. Select Create a new virtual machine. Click Next.
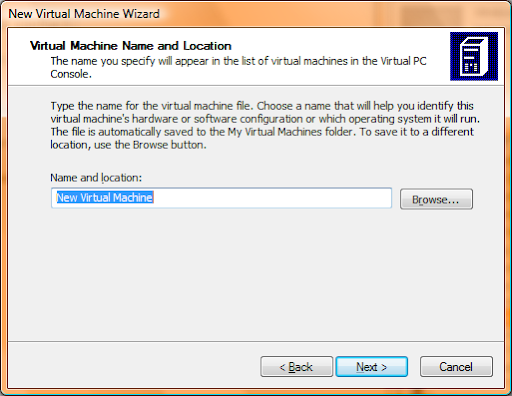
- 3. Type the name and location. The default is New Virtual Machine. To create the VM on your external hard drive, enter the location and a name called WindowsEntServer2003BaseImage. and Click Next.
-
4. Select an operating system as Windows Server 2003 and Click Next.

-
5. Adjust the RAM. For this base image 1 GB or 1024 MB will suffice and Click Next.

- 6. Select A new virtual hard disk option and Click Next.

- 7. Create the hard disk in the same location that you selected in step 4. Adjust the virtual hard disk size 6 GB is a good start. You can resize the disk at any time and Click Next.
- 8. Click Next and Finish to completed the process.
Once the machine is created, add a second network adapter on the virtual machine to your host machine's Loopback Adapter.
-
1. Click Settings.
-
2. Click Networking.
-
3. Change the setting Number of network adapters to 2.
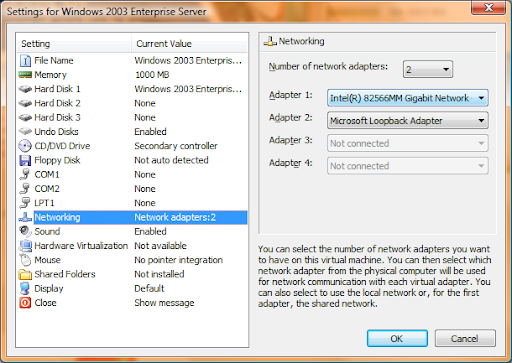
- Incase if you do not know how to Install Microsoft Loopback Adapter. Go to this website and follow the steps to install (How to install the Microsoft Loopback adapter in Windows XP)
- 4. Change the setting Adapter 2 to Microsoft Loopback Adapter.
-
5. Click OK.
Install an operating system on Virtual PC.
-
1. Virtual PC, click Start
-
2. If you have a Windows Server 2003 Enterprise R2 CD or DVD, insert it in your host machine now. If you have a Windows Server 2003 Enterprise R2 ISO image file, Go to menu bar, click CD, then Capture an ISO Image, and browse to the location of your Windows Server 2003 Enterprise R2 ISO image. Open the image.
-
3. Follow the instructions to install the server operating system.
Once everything done, then the OS need to activate and Windows Update is run to install all available service packs and patches.
Edit the HOSTS File
Since the virtual network will not going to be served by the same DNS server used by the host machine. You need to locate a virtual machine by name rather than IP address, To edit Host file follow the steps.
-
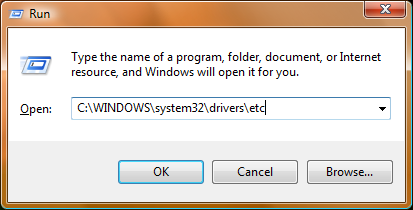
1. Got Run and enter C:\WINDOWS\system32\drivers\etc Right-click the HOSTS file and select Open.

- 2. In the pop-up, select Notepad. Click OK.
-
3. Add the IP address and machine name of your virtual machine on a blank line.
-
5. Close the Window, and click Yes when prompted to save the changes.
Install ASP.NET 2.0 and ASP.NET 3.0
ASP.NET and Windows Workflow Foundation (WF). Both are required by SharePoint. ASP.NET 3.0 package Include above items, So follow the steps to Install.
-
1. Copy .NET setup file to your VPC or Share folder and access form VPC
-
2. When you double click it prompted to Run, Open, or Cancel, click Run or Open.
-

-
3. Prerequisites will be checked and files will be copied.
-
4. Agree with the terms, accept the license and click Install.
-
5. When installation is complete, click Exit.
Allow ASP.NET 2.0 Web Service Extensions in IIS
- 1. Select Start - Administrative Tools - Internet Information Services (IIS) Manager
- 2. In the Internet Information Services management console, expand the server name in the left pane, then select Web Service Extensions:
- 3. In the right pane, select ASP.NET v2.0.50727, then click the Allow button:

Install Windows SharePoint Service 3.0 SP 1
- 1. Copy .NET setup file to your VPC or Share folder and access form VPC
- 2. When you double click it prompted to Run, Open, or Cancel, click Run or Open.
-
4. Agree with the terms, accept the license and click Install.
-
5. When installation is complete, click Exit.
Back Up Your Base Image
Congratulation... Now you have created a reusable base image. Start to make a backup this image. So that you can save time when creating servers in the future.
- 1. Click Start and Shut down your VM. Enter a reason of "Base Image Backup".
- 2. Once the files are backed up, you can create a new machine by moving or copying the VHD into another folder, renaming it according to purpose
-
3. Prerequisites will be checked and files will be copied.
Install SharePoint on Virtual Machine
-
1. Virtual PC, click Start
-
2. If you have a SharePoint 2007 Server with Service Pack 1 CD or DVD, insert it in your host machine now. If you have a SharePoint 2007 Server with Service Pack 1 ISO image file, Go to menu bar, click CD, then Capture an ISO Image, and browse to the location of your Windows Server 2003 Enterprise R2 ISO image. Open the image.
-
3. Follow the instructions to install the server operating system.
- 4. Insert the MOSS 2007 installation media, start the installation, enter the Standard / Enterprise product key, then click the Continue button:

- 5. Select I accept the terms of this agreement checkbox, then click the Continue button:
- 6. On the Select the installation you want screen, click the Advanced button:

- 7. Server Type tab, select the Complete option and then click the Install Now button:

- 8. Once the installation is complete, select the Run the SharePoint Products and Technologies Configuration Wizard now checkbox, then click the Close button

- 9. Run and SharePoint Configuration Wizard
- 10. On the Welcome to SharePoint Products and Technologies screen, click the Next button:

- 11. In the services may have to be started or reset dialog box, click the Yes button:

- 12 On the Connect to a server farm screen, select the No, I want to create a new server farm option, then click the Next button:
- 13. SharePoint Setup will complete 1of10 steps to auto configure
- 14. Congratulation.. You installed and configured MOSS 2007 application running inside the virtual machine.
You can also view this article at www.codeproject.com to view click here
2 comments:
Setup is unable to proceed due to the following error(s):
This product requires ASP.NET v2.0 to be set to 'Allow' in the list of Internet Information Services (IIS) Web Server Extensions. If it is not available in the list, reinstall ASP.Net v2.0.
Correct the issue(s) listed above and re-run setup.
For above error
No need to uninstall everything with regards to the error under 32bit. Do the following and it should resolve the issue. For some reason installing the .NET Framework 3.x causes this to occur.
C:\WINDOWS\Microsoft.NET\Framework\v2.0.50727>aspnet_regiis -u (uninstall)
C:\WINDOWS\Microsoft.NET\Framework\v2.0.50727>aspnet_regiis -i (reinstall)
hi fazal sir,
this is hasan from delhi.
i have done my mca from biral intit..
i have 3 year exp on .net.
plz i wana to move on sharepoint so gued me how i move n gett good job in Shrepoint.
my email id is hasan_bias@yahoo.com
Post a Comment